How to Replace Gearbox on 60in Jd mowing deck
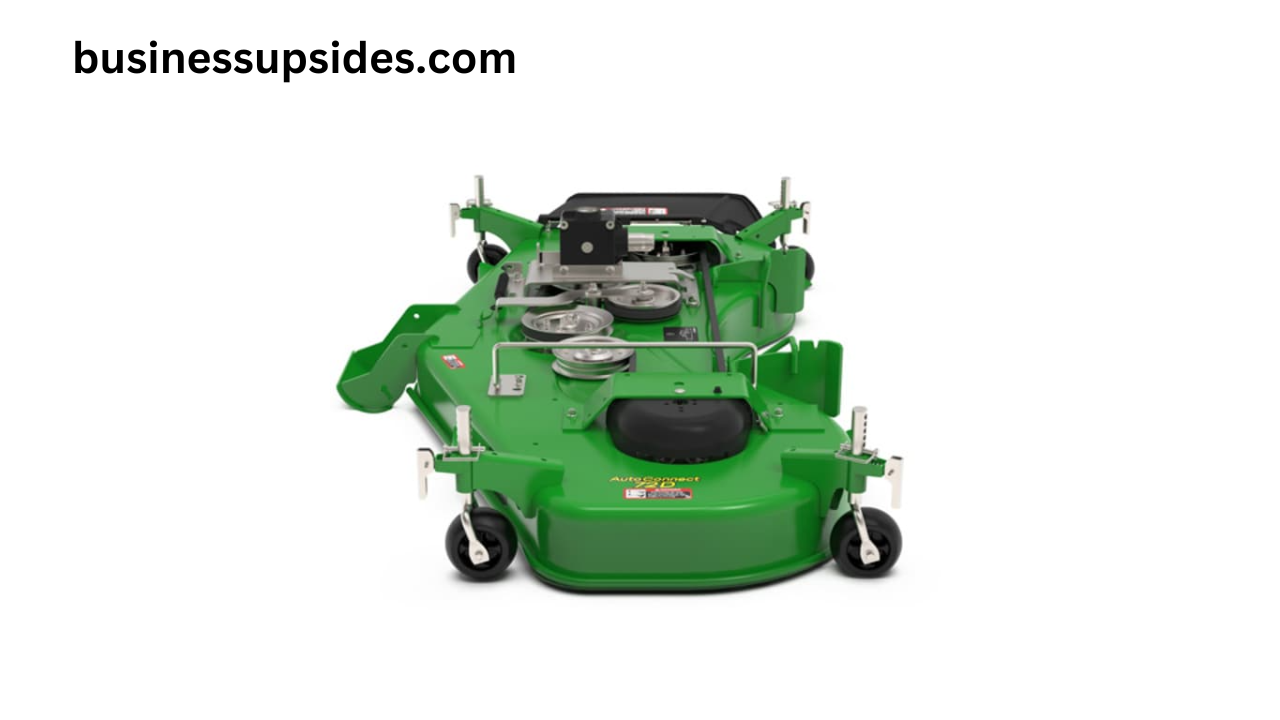
A John Deere mower is a reliable piece of equipment that provides excellent performance for residential and commercial use. One critical component of a John Deere mower, especially when it comes to larger models like there replace gearbox on 60in jd mowing deck. This part is essential for transferring power from the engine to the mower blades, allowing them to rotate and cut grass efficiently.
Over time, the gearbox can wear out due to constant use, particularly if it’s not properly maintained. If you notice that your mower’s blades aren’t spinning correctly or if you hear unusual grinding or noise from the deck, it may be time to replace the gearbox. This is a complex but manageable task, and with the right tools and knowledge, you can perform the replacement yourself.
This article provides a step-by-step guide to help you replace the gearbox on a 60-inch John Deere mowing deck. By following these instructions, you can save money on repair costs while ensuring that your mower continues to work effectively.
Understanding the replace gearbox on 60in jd mowing deck
Before diving into the replacement process, it’s important to understand the role of the gearbox on your 60-inch John Deere mower deck. The gearbox is the mechanism that converts the engine’s rotational power into the spinning motion that drives the mower blades. It essentially transfers the power from the drive system to the blade spindles, which are responsible for cutting the grass. Without a functioning replace gearbox on 60in jd mowing deck, your mower’s blades will not rotate, rendering it useless.
There are several signs that your gearbox may be failing, including:
- Unusual noises like grinding, whining, or buzzing
- Blades not spinning or spinning unevenly
- Leaking oil or grease from the gearbox
- Excessive vibration or wobbling of the deck
When these issues arise, replacing the gearbox becomes the most viable option to restore the mower’s performance.
Tools and Materials You’ll Need
Before you begin the gearbox replacement process, gather all the necessary tools and materials. Having everything ready will ensure that the job goes smoothly and efficiently.
Tools:
- Socket wrench set
- Wrenches (adjustable or fixed)
- Screwdrivers (flathead and Phillips)
- Torque wrench
- Gearbox oil or grease (if necessary for the new gearbox)
- Pry bar (optional for stubborn bolts)
- Jack or lift (to raise the mower deck)
- Safety gloves and goggles (for personal protection)
Materials:
- Replacement gearbox for the John Deere 60-inch mowing deck
- Replacement bolts (if the old bolts are stripped or damaged)
- Replacement drive belt (if needed)
- Gearbox oil (if the new gearbox requires lubrication)
Ensure that you purchase a high-quality, compatible replacement gearbox specifically designed for the 60-inch John Deere deck. Using the right part will ensure optimal performance and prevent further mechanical issues down the line.
Step-by-Step Guide to replace gearbox on 60in jd mowing deck
Now that you’re equipped with the right tools, let’s go through the process of replacing the gearbox on your John Deere 60-inch mowing deck.
Step 1: Preparation and Safety First
Before starting any mechanical task, safety is paramount. Ensure that the mower is powered off and that there is no risk of accidental startup. Start by disconnecting the battery to avoid any electrical hazards.
Safety Tips:
- Wear safety gloves to protect your hands from sharp edges on the mower and gearbox.
- Wear safety goggles to shield your eyes from debris that may fly up during the process.
- Make sure the mower is on a stable, level surface before you begin working.
If you’re working in a garage or shop, you may want to lay down a tarp or plastic sheet to catch any parts or oil that may spill out.
Step 2: Lifting the Mower Deck
To access the gearbox, you may need to raise the mower deck. This can be done by either using a jack or lifting the entire deck off the mower, depending on the setup. Raising the deck will give you better visibility and allow you to maneuver the replace gearbox on 60in jd mowing deck more easily.
If your mower has a hydraulic or mechanical lift system, use the controls to raise the deck. If the mower is not equipped with a lift, use a jack to raise the deck to a height where you can work comfortably underneath it.
Step 3: Disconnecting the Drive Belt
Before you can remove the gearbox, you must first disconnect the drive belt that powers the mower blades. The belt connects to various pulleys and the gearbox, so it must be removed in order to detach the gearbox safely.
To disconnect the drive belt:
- Locate the belt tensioning mechanism (usually a spring-loaded idler pulley).
- Release the tension on the belt by moving the pulley away from the belt.
- Carefully slide the belt off the pulleys.
Take note of how the belt is routed around the pulleys because you’ll need to reinstall it in the same configuration after replacing the gearbox.
Step 4: Removing the Old Gearbox
With the drive belt disconnected, you can now focus on removing the old gearbox. Begin by identifying the bolts or screws securing the gearbox to the mower deck. Typically, the gearbox is mounted using multiple bolts that hold it in place.
To remove the old gearbox:
- Use a socket wrench to remove the bolts securing the gearbox to the deck. Keep the bolts for reinstallation unless the new gearbox comes with its own mounting hardware.
- If the gearbox is connected to the blade spindle, use a wrench to disconnect the spindle from the gearbox.
- Carefully remove the gearbox from its mounting position. Depending on the condition of the old gearbox, you may need to use a pry bar to loosen it from its mount.
Be careful when removing the gearbox, as some oil or grease may spill out. Make sure to have a rag or container ready to catch any excess fluid.
previous article; All New 2024 Harley Davidson motorcycles An In-Depth Look
Step 5: Installing the New replace gearbox on 60in jd mowing deck
With the old gearbox removed, it’s time to install the new one. Place the new gearbox into position, aligning it with the mounting holes and spindles.
To install the new gearbox:
- Position the gearbox where the old one was mounted, making sure it lines up with the holes.
- Reattach the gearbox to the deck using the bolts or screws. Tighten them securely using a wrench or socket, but be careful not to overtighten, as this can damage the mounting holes.
- If the gearbox is connected to the blade spindle, reattach the spindle to the gearbox using the appropriate tools.
If the new gearbox requires lubrication, be sure to follow the manufacturer’s instructions on adding oil or grease. Some gearboxes come pre-lubricated, but others may require you to fill them with a specific type of oil before use.
Step 6: Reinstalling the Drive Belt
Once the gearbox is securely installed, the next step is to reinstall the drive belt. This is an important step, as the belt needs to be properly routed for the mower to function correctly.
To reinstall the drive belt:
- Position the belt around the pulleys, ensuring that it matches the original routing configuration.
- Use the belt tensioning mechanism to apply the necessary tension to the belt.
- Double-check that the belt is properly aligned and sits correctly in the pulleys.
Ensure that the belt has the correct amount of slack, as an overly tight or loose belt can cause issues with blade rotation.
Step 7: Lowering the Mower Deck
With the replace gearbox on 60in jd mowing deck and drive belt in place, it’s time to lower the mower deck back to its normal position. Use the lift mechanism or jack to lower the deck carefully.
Step 8: Testing the Mower
Before putting everything back into full operation, it’s important to test the mower to ensure that the gearbox replacement was successful. Start the mower and engage the blades. Listen carefully for any unusual noises and check that the blades are spinning at the correct speed.
If the mower runs smoothly and the blades rotate evenly, you have successfully replaced the gearbox.
Troubleshooting Common Issues
If your mower is still having issues after replacing the gearbox, here are a few things to check:
- Belt Tension: If the belt is too loose or too tight, the blades may not spin properly. Adjust the belt tension to ensure proper operation.
- Incorrect Routing: Double-check that the drive belt is routed around the pulleys as it was before. Incorrect routing can prevent the gearbox from functioning correctly.
- Gearbox Installation: If the gearbox is not seated correctly or the mounting bolts are not tightened properly, it can cause issues with blade rotation.
Conclusion
Replace gearbox on 60in jd mowing deck is a manageable task that can be completed with the right tools, parts, and patience. By following the steps outlined in this guide, you can restore the functionality of your mower and keep it running smoothly for years to come. Always prioritize safety during the replacement process, and don’t hesitate to seek professional help if you encounter issues beyond your skill level.
With proper care and maintenance, your John Deere mower will continue to serve you well, providing a clean, even cut every time you take it out for a spin.


Post Comment